


Dogwood quilting, sometimes known as orange peel quilting, is one of my favorite go-to all over quilting patterns. When you use larger circles, it is possible to quilt this stitch with a walking foot. It is easiest to do by free motion quilting, but for some quilters a walking foot can be less stressful to use.
- Walking foot or free motion quilting foot
- Your favorite pens or markers to mark your quilt top
- A ruler (any quilt ruler will do)
- A round object such as a bowl or lid (the larger the object, the easier it is to quilt with a walking foot)

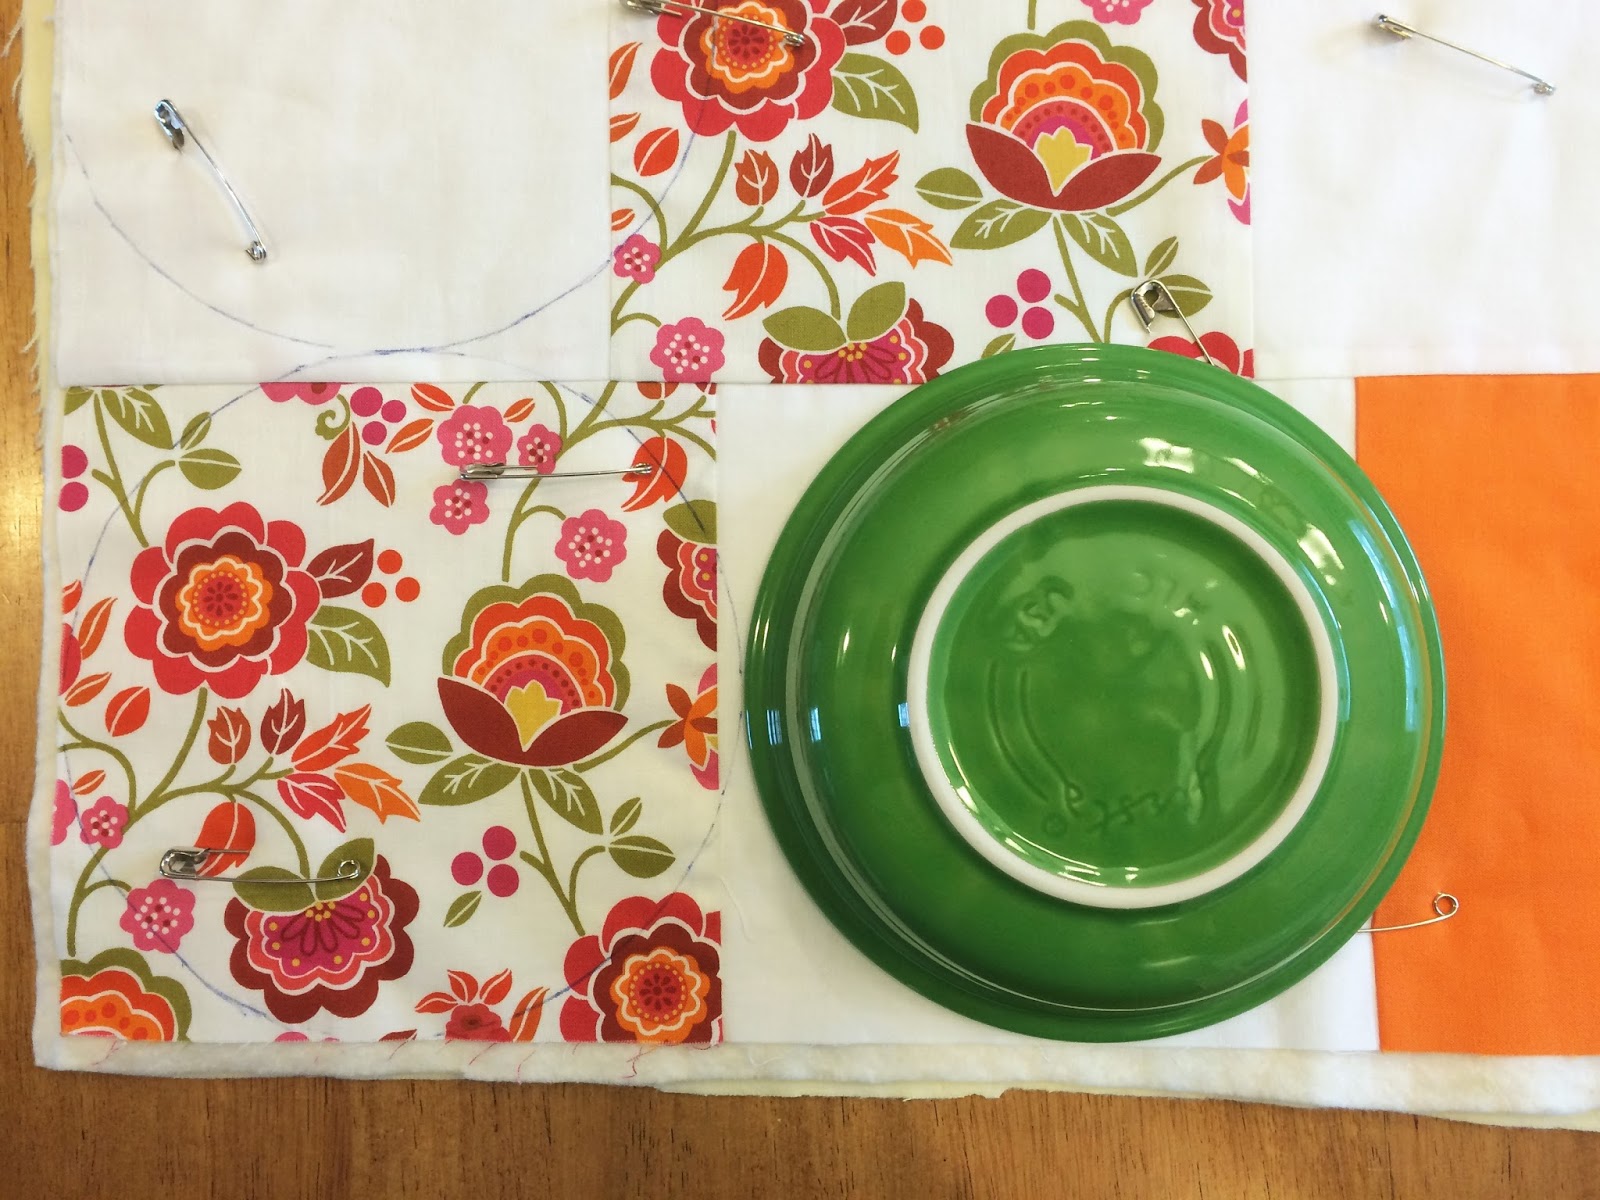
Next, you need your round object.

The cereal bowl I used was a scant 7" in diameter.

Align the bowl (round object) on one of the quilt top corners. Trace around the bowl.

It's hard to see my dark blue lines! Align the bowl against one edge of the quilt and the edge of your traced circle. Trace around the bowl again.


Keep putting the bowl next to each circle, tracing a new circle every time. When you get to the end of the quilt top and have completed an entire row of circles, the last circle may or may not be complete. This doesn't matter!

Start the next row of circles.
Keep tracing until you have covered the quilt in circles.

Along one edge of the quilt, mark in half the diameter of your circle. For me, half of 7" would be 3 1/2". Do this again on the adjacent side so your lines intersect by the quilt corner. Draw these lines on the 2 sides your circles are complete.

Now, start drawing circles, but start so that the bowl is only half way on the quilt top.

Keep drawing this second layer of circles until you have covered the quilt.


Now you can start quilting! The line with the green tick marks is the one I will sew on. From here on, you are basically making a diamond quilting pattern, just with wavy lines instead of straight.


The next line to sew over is the line with the dark tick marks.

Continue sewing all the diagonal wavy lines going in one direction across the quilt. Then, sew over the diagonal lines that are going in the other direction. If these were straight lines, they would be perpendicular.

Thank you for coming by the blog! Happy dogwood quilting!
Beautiful!!!!
ReplyDeleteThanks for the helpful directions, very time saving and yours looks great, love how it puffs up after washing.
ReplyDeleteWhat a great tutorial!! This makes me feel like I could actually quilt this design! Thanks :-)
ReplyDeleteThank you Lynn and Sharon! I am glad you found the tutorial helpful!
ReplyDeleteNice tutorial! What do you prefer for marking the quilt?
ReplyDeleteThank you Bernie! I like to use Frixion Erasable Pens, they erase with heat so you can just iron the markings. The ink also washes out in the washing machine. However, they only work on medium/light to very light colored fabrics. Something about the dye in medium/dark and very dark fabrics reacts with the pens and leaves faint markings that don't wash out. You can still use them for marking areas on dark fabrics that won't be seen, just not directly on the quilt top.
DeleteFor dark fabrics I would recommend a washable pen or pencil, not a Frixion Pen. Always test any pens on the same fabrics your quilt to is made of to double check they will wash out completely.
Thank you for a great tutorial! Just the marking might take me several days, I'm thinking?
ReplyDeleteThank you, I'm glad you liked the tutorial! It took me 3 hours after basting to mark the baby quilt in the tutorial using a 7" wide bowl. The first quilt I ever made with dogwood quilting was 75" square, and it took me 2 days to mark after basting using a 4.5" cup. I spent about 4-5 hours a day marking it. The 4.5" cup was much too small for a quilt of that size!
DeleteGreat tutorial! I know marking takes time, but it is well worth it for the results. I like how you ignored the lines on the quilt, that way you could use any size pattern (or bowl in this case)! Visiting from Forth Worth Fabric Studio link party.
ReplyDeleteThank you! The first quilt I used this quilting method on I matched the bowl size to the finished block size which was 4.5". It took forever to mark!
DeleteSuch a great tutorial Abby! Thank you for sharing! We featured your quilt over on the FWFS blog! Thank you for stopping by and linking up!
ReplyDeletehttp://fortworthfabricstudio.blogspot.com/2016/04/fabric-frenzy-friday-features_25.html
-Lindsey
Thank you so much!
DeleteThe tutorial is beautifully written and the direction are very well explained. Also, the Quilt Pattern and the Quilting Design are excellent for beginners and experienced alike. Thanks so much.
ReplyDelete