


 |
| Layer cake squares ready to be cut into some more squares! |
Some may think of it as the scariest part of quilting, that time when you are cutting apart all of your gorgeous yards of fabric. I find it to be one of the most fun and relaxing parts of the process. I love to see the pieces of my quilt getting cut so they can be put together in a beautiful design. Well, it does depend on what I'm cutting. Hundreds of squares are easy to cut if you stack several layers of fabric. My rotary cutter goes through about 10 layers of fabric with ease (14 if I push on it hard enough!). Width of fabric (WOF) strips are also fun to cut. I love strip and tube piecing methods, like in my Falling Blocks Baby Quilt, that utilize WOF strips. The strips are sewn together along the WOF, then cut apart to quickly piece many tiny squares.
To me, triangles aren't quite as fun to cut, though I do like the amazing patterns you can make with equilateral triangles. The worst part of the fabric cutting, no matter what shape of piece you are cutting, would be the very beginning, as you are making that first cut. That's what starts it all, the first whole yard of fabric is no longer whole. Once I really get cutting, and I have all my strips cut and ready to be cut into squares, it all goes fast.
 |
| Cut fabric to be used in a new fat quarter quilt. |
Usually, when starting to cut for a new pattern, I will only cut the pieces for one of each different block in the quilt. Then, I like to sew together one of every block to double check that my pattern works out. Once I know all the quilt math is correct I can start cutting fabric with confidence. Another tip is to always cut a few more blocks then you need. Example: If you need 50 squares that measure 3" x 3", it can be a good idea to cut at least 3-4 more and keep them with you as you are sewing. If you ever need to rip out stitches and accidentally tear, stretch, or cut a square, no worries! Just grab a spare square. When your done with your quilt top just toss the extra squares in your scrap stash. If you have enough of them, you can make a matching pillow or two to go with your quilt. Like I did with the scraps from My Purple Quilt.
Cutting extra squares can save time and frustration as you sew together your quilt top. No digging out the leftover fabric to cut just one more square, and no hoping that you even have enough leftover fabric!
 |
| A couple of blocks that I made before I started cutting the rest of my fabric. |

I like to cut pieces from one fabric at a time. First, it's best to iron your fabric in half, selvage to selvage just like it comes already folded, then square it up.
Squaring Up Your Fabric
Iron your fabric in half selvage to selvage, just like it should already come folded. As you iron, make sure the selvages are even to each other and you make a crease at the bottom fold. The flatter your fabric is the easier it will be to cut! If you think you need to, double check that your fabric was cut to the proper length when you bought it. If you prewash your quilting fabric, it could have shrunk more than you thought it would. Or, if it's your own pattern, you may have miscalculated how much you needed. This would be terrible to find out after you already cut out most of your squares!
*Note: I am using a fat quarter for this example because it is easier to photograph so you can see all of it. The same method applies to both fat quarters and whole yards of fabric.
**Note #2: I have badly miscalculated how much fabric I needed before, and it isn't fun to figure out in the middle of cutting. Because of this I have learned how to improvise, but I'd rather not have to deal with it!

 |
| Try to get those selvages as even as you can! |
 |
| Iron the bottom fold. |
Be sure to place your ruler edge just before the sides of the fabric become uneven. This can be seen in the last 2 of the next 3 photos.
 |
| Ruler aligned on the bottom fold of the fabric. |
 |
| Ruler placed just before the fabric is uneven. |
 |
| Ruler placed just before the fabric is uneven. |

One side of your fabric is now even and perpendicular to the selvages and the fabric fold. Repeat on the opposite side so that your entire piece of fabric is a nice rectangle. If you like, you can cut off the selvage from the entire piece of fabric before you begin cutting. I do this for smaller pieces of fabric, but for larger ones I find it easier to cut off as I cut out my squares.
Once your fabric is squared up, you can get to cutting your quilt top pieces! Lets break down some of that quilt math involved.
For example, lets say you want 36 squares that measure 5 1/2", and 42 squares that measure 4 3/4". These squares are NOT from any specific pattern, they are just an example.
So you want to cut:
- 36 - 5 1/2" squares
- 42 - 4 3/4" squares
I like to assume the width of fabric (WOF) is 41" if I am using quilting cotton, though sometimes they can be 42"-43" wide. 41" is a safe number to assume. Some fabrics and brands my vary greatly, or you could be using a fabric that has a different width. If you are not sure, measure your fabric when it's folded and half, subtract the width of the selvage, and multiply it by 2.
- Divide your WOF by the width of your squares.
41" divided by 5 1/2" = 7.456"
This means, from every WOF strip, you can cut 7 squares that measure 5 1/2", with some leftover.
- Divide the number of squares you want by the number of squares you can cut from a WOF strip.
36 squares divided by 7 squares = 5.143
Multiply the number of squares you get from each WOF strip by the number of whole WOF strips needed.
7 x 5 = 35
36 squares needed - 35 squares = 1 square leftover
This means you will need 5 WOF strips plus 1 square to cut out your squares.
For the 4 3/4" squares:
- Divide your WOF by the width of your squares
41" divided by 4 3/4" = 8.632"
From every WOF strip you can cut 8 squares that measure 4 3/4", with some leftover.
- Divide the number of squares by the number of squares you can cut from a WOF strip.
42 squares divided by 8 squares = 5.25
Multiply the number of squares you get from each WOF strip by the number of whole WOF strips needed.
8 x 5 = 40
42 squares needed - 40 squares = 2 squares leftover
This means you will need 5 WOF strips plus 2 squares to cut out you squares.
So, here is the layout of the strips and squares to cut on a piece of fabric.
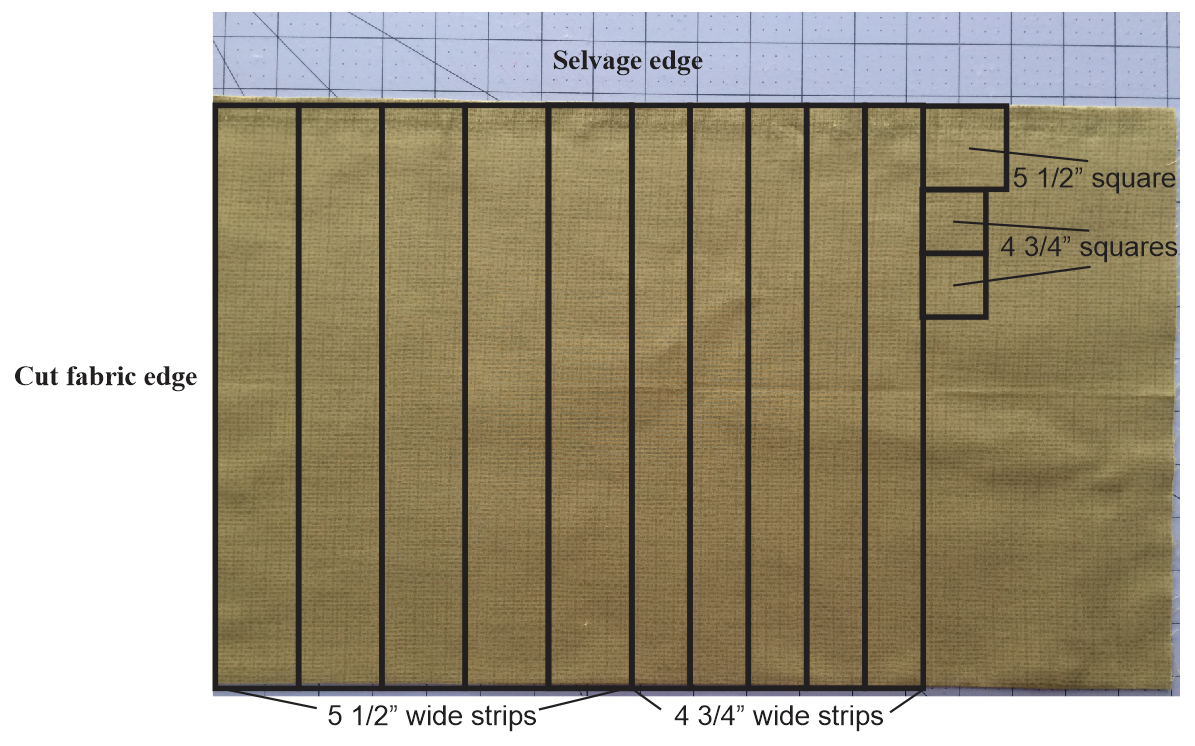
If you write out all your steps and keep track of all your measurements, it's easy! Now, how about some extra squares in case you rip or stretch one? Most of the time it's best to just cut out an extra WOF strip for every square size you are cutting. For fabric cuts that end like the one above, with only a few squares being cut at the end, you can go ahead and cut an entire WOF strip, then cut those 3 squares from the strip. This is shown below.
 Cut the 1 - 5 1/2" square and the 2 - 4 3/4" squares from that last 5 1/2" wide strip, then save the rest of your strip to cut any extra 5 1/2" or 4 3/4" squares as you need them. Any other leftover fabric can be packed away in your stash.
You could also draw your piece of fabric on graph paper. Here is an example below where I draw one yard of fabric (36" x 41") when it is folded in half (36" x 20 1/2"). Each square equals 1".

After I drew my fabric, I drew the fabric pieces I wanted to cut. In this case, I wanted:

After you have cut your strips, Either lay them in stacks to cut apart into squares, or cut them up one at a time, leaving them folded in half. Why leave them folded in half? As long as you ironed your fabric well and there is a good crease at the bottom fabric fold, it's much faster to cut at least 2 squares at a time then one. Some rotary cutters can go through several layers of fabric. Test yours out on some scraps to see how many layers it can go through, and how many layers you are comfortable cutting through. Just because the rotary cutter can cut through all those layers doesn't always mean you can cut it straight.
As you cut your strips from the fabric, and as you cut squares from the strips, it's better to go slow and have accurate cuts than it is to go fast and end up with incorrect square sizes.
To sum it up:

You could also draw your piece of fabric on graph paper. Here is an example below where I draw one yard of fabric (36" x 41") when it is folded in half (36" x 20 1/2"). Each square equals 1".

After I drew my fabric, I drew the fabric pieces I wanted to cut. In this case, I wanted:
- 5 - 5 1/2" strips to be cut into squares (pink area)
- 4 - 2 1/2" squares (green area)
Afterwards there was some leftover fabric. This is filled in with dark blue.

After you have cut your strips, Either lay them in stacks to cut apart into squares, or cut them up one at a time, leaving them folded in half. Why leave them folded in half? As long as you ironed your fabric well and there is a good crease at the bottom fabric fold, it's much faster to cut at least 2 squares at a time then one. Some rotary cutters can go through several layers of fabric. Test yours out on some scraps to see how many layers it can go through, and how many layers you are comfortable cutting through. Just because the rotary cutter can cut through all those layers doesn't always mean you can cut it straight.
As you cut your strips from the fabric, and as you cut squares from the strips, it's better to go slow and have accurate cuts than it is to go fast and end up with incorrect square sizes.
To sum it up:
- Iron your fabric well, then square it up. As you do this, it can also be a good idea to double check the fabric was cut to the proper length when you bought it. Or, if you prewash your fabric, it could have shrunk more than you thought it would. You don't want to see that you don't have enough fabric just before you get to the end of your cutting!
- Cut enough pieces for one of every block type if you are unfamiliar with the pattern. Double checking your work, and the pattern, can really save you some trouble. Also, no one likes to waste pretty fabric!
- Plan what you need to cut.
- Write everything out.
- Double check your quilt math!
- Sketch your fabric on some graph paper and draw the pieces onto the fabric if you need a visual. Sometimes when you are working with a lot of pieces and different fabrics, this can really help.
- Keep track of what you have cut and go slow. Tackling a big quilting project that has hundreds upon hundreds of pieces can be quite fun and relaxing if you take your time and track what you have done, and what you need to do. Don't be afraid to write down every square you have cut to help you remember that you did cut it.
Those are all of my favorite tips for cutting out all those quilt squares. Thank you for reading my blog, and happy sewing!
As a fairly new quilter this is the best "cutting fabric" tutorial I have seen. And you make it sound more like fun.
ReplyDeleteThank you
Thank you! I'm glad you found it helpful!
Delete