


You can never have too many cute pincushions! What I love about having a big cube pincushion instead of a flat pillow or tomato shaped one is that my long quilting pins won't poke through to the bottom. This pincushion would also work great as a pillow if you made it larger. Sewing cubes seems scary at first, but if you pay attention to your seam allowance it's super easy. You may have so much fun sewing together a cube that you will make a few more. That's what I did; I ended up making 4 already, and I have fabric set aside for some more!
Scroll down to the tutorial and hit the "Print Pattern" button to get the free PDF tutorial.
The big red and white pincushion I purposely made giant. It is a 6" cube made of different mini quilt blocks. I have a habit of carrying my pincushion from my cutting mat, to the sewing machine, or to the ironing board, then I forget where I left it. Those pincushion bracelets are a good idea, but I find them uncomfortable and they don't hold enough long quilting pins for me. Thus, I made a pincushion so big I can't lose it! Plus it holds all of my pins with room to spare. I love seeing the red and white cube next to my sewing machine, it's the perfect sewing room decoration.


I layered my cube sides onto quilt batting, then quilted them before I assembled the cube. This is optional, but it helps to prevent the polyester filling from poking through the fabric. It also adds a little stiffness to the cube. You can control the amount of stiffness you add to the sides by adding more or less quilting to each piece. More quilting puts more stitches into the fabric and causes it to be slightly stiffer. Now, before I start the tutorial I will list a few things to keep in mind before you start sewing, and after you sew.
- Keeping a consistent seam allowance is important. The seam allowances on my pincushions were 1/4". I did this because my mini quilt blocks had to been sewn together with a 1/4" seam allowance. What your seam allowance is doesn't matter, however, you need to know exactly what your seam allowance is and keep using it consistently. Is it 3/8", 1/4", or maybe a little off from both of those, about 5/16"? You will need to measure the length of your seam allowance down the fabric edge to get proper cube corners.
- If you use mini quilt blocks to make your cube, be sure to sew down a scant 1/4" seam allowance around each block to prevent the quilt blocks from popping apart when you turn the cube right sides out.
- Batting and quilting are completely optional. I love the quilted look, and I like the added durability. You also have the option of using interfacing, or even polyester fleece. I would not recommend polyester quilt batting. Bearding usually happens most often with polyester batting. What is bearding? It's when the batting begins to poke through the fabric. All those pins going in and out of the pincushion are sure to increase the chances of bearding.
- You can piece together your cube sides, or use solid pieces of fabric. Craft felt is also a popular material to use for pincushions, so you could experiment with that. When using any material, you have the option of embroidering or hand quilting it before assembling the cube.
- Back stitch all of your seams well at the beginning and end of every seam. This is very important to keep your cube corners from breaking apart.
- Feel free to embellish your pincushion by hand sewing or hot gluing whatever you want to it, even after you have sewn it together. I'm not one for embellishments, but I have seen some beautiful pincushions covered in fabric yo-yos, ribbon, and ric rac.
Supplies for your pincushion:
- 6 fabric (or felt) squares all the same size. I used 5" squares for my smaller pincushion, which with a 1/4" seam allowance they had a finished size of 4 1/2". For my giant pincushion, I made quilt blocks with a finished size of 6".
- Enough filling to stuff your pincushion. You will have to be the judge of how much you should get depending on the size of your pincushion, and the desired density. I used polyester filling, and I filled them until they were solid and held their shape, yet still had some give if you squeezed them. Cotton filling, or another pincushion filling, will work also.
- A good ruler with 1/8" markings. If your ruler has 1/16" markings, that is even better.
- Optional: 6 pieces of quilt batting (or interfacing, or fleece) a little larger than your fabric squares.
- Optional: Any other embellishments you want!

How to Sew a Cube: Cube Pincushion Tutorial
Difficulty:
Confident Beginner
Recommended skills:
Basic sewing skills and quilting (optional). If piecing quilt blocks: Fabric cutting, fabric piecing.
Width of fabric (WOF) assumed to be 41".
All seam allowances 1/4".
 Print Pattern
Required Tools
- Fabric Scissors
- Ruler (one with 1/8" markings is preferred)
- If piecing quilt blocks to make the cube:
- Rotary Cutter
- Cutting Mat
- Acrylic Ruler (for fabric cutting)
Materials
- 6 fabric (or felt) squares all the same size.
- Enough filling to stuff your pincushion. Amount depends on the size of the pincushion and the desired density.
- Optional: 6 pieces of quilt batting (or interfacing, or fleece) a little larger than your fabric squares.
- Optional: Any other embellishments you want!
Notes
1. Batting and quilting are completely optional. I love the quilted look, and I like the added durability. You also have the option of using interfacing, or even polyester fleece. I would not recommend polyester quilt batting. Bearding usually happens most often with polyester batting. What is bearding? It's when the batting begins to poke through the fabric. All those pins going in and out of the pincushion are sure to increase the chances of bearding.
2. Feel free to embellish your pincushion by hand sewing or hot glueing whatever you want to it, even after you have sewn it together. I'm not one for embellishments, but I have seen some beautiful pincushions covered in fabric yo-yos, ribbon, and ric rac.
Instructions:

Optional Step 1: Lay the 6 fabric squares on quilt batting, or other lining such as interfacing or fleece. Pin if desired. Quilt your pieces as desired. You could do simple straight quilting, or free motion quilt a design.
 |
| Layered squares. |
 |
| Quilted Squares. |
Step 2: Set aside one fabric square as the bottom of your cube, one for the top, and the rest for the sides. Lay one side square and the top square right sides together.
*Note: Why begin sewing the sides to the top first? This way the final seam after turning the cube right sides out will be at the bottom, much less noticeable than at the top.

Step 3: Using a 1/4" seam allowance*, sew across one side of the squares, beginning and ending 1/4" away from the ends.
**Note: You may use whatever seam allowance you like, though 1/4" is recommended for a small pincushion. For a larger pillow, you may want to use a 1/2" seam allowance to make it more durable. Make sure that when you begin and end your seam, the distance away from the squares ends should equal your seam allowance. Example for 1/2" seam allowance: Using a 1/2" seam allowance, sew across one side of the squares, beginning and ending 1/4" away from the ends.


Your seam should resemble the photo above. The photo below is what your squares should look like when you open them.

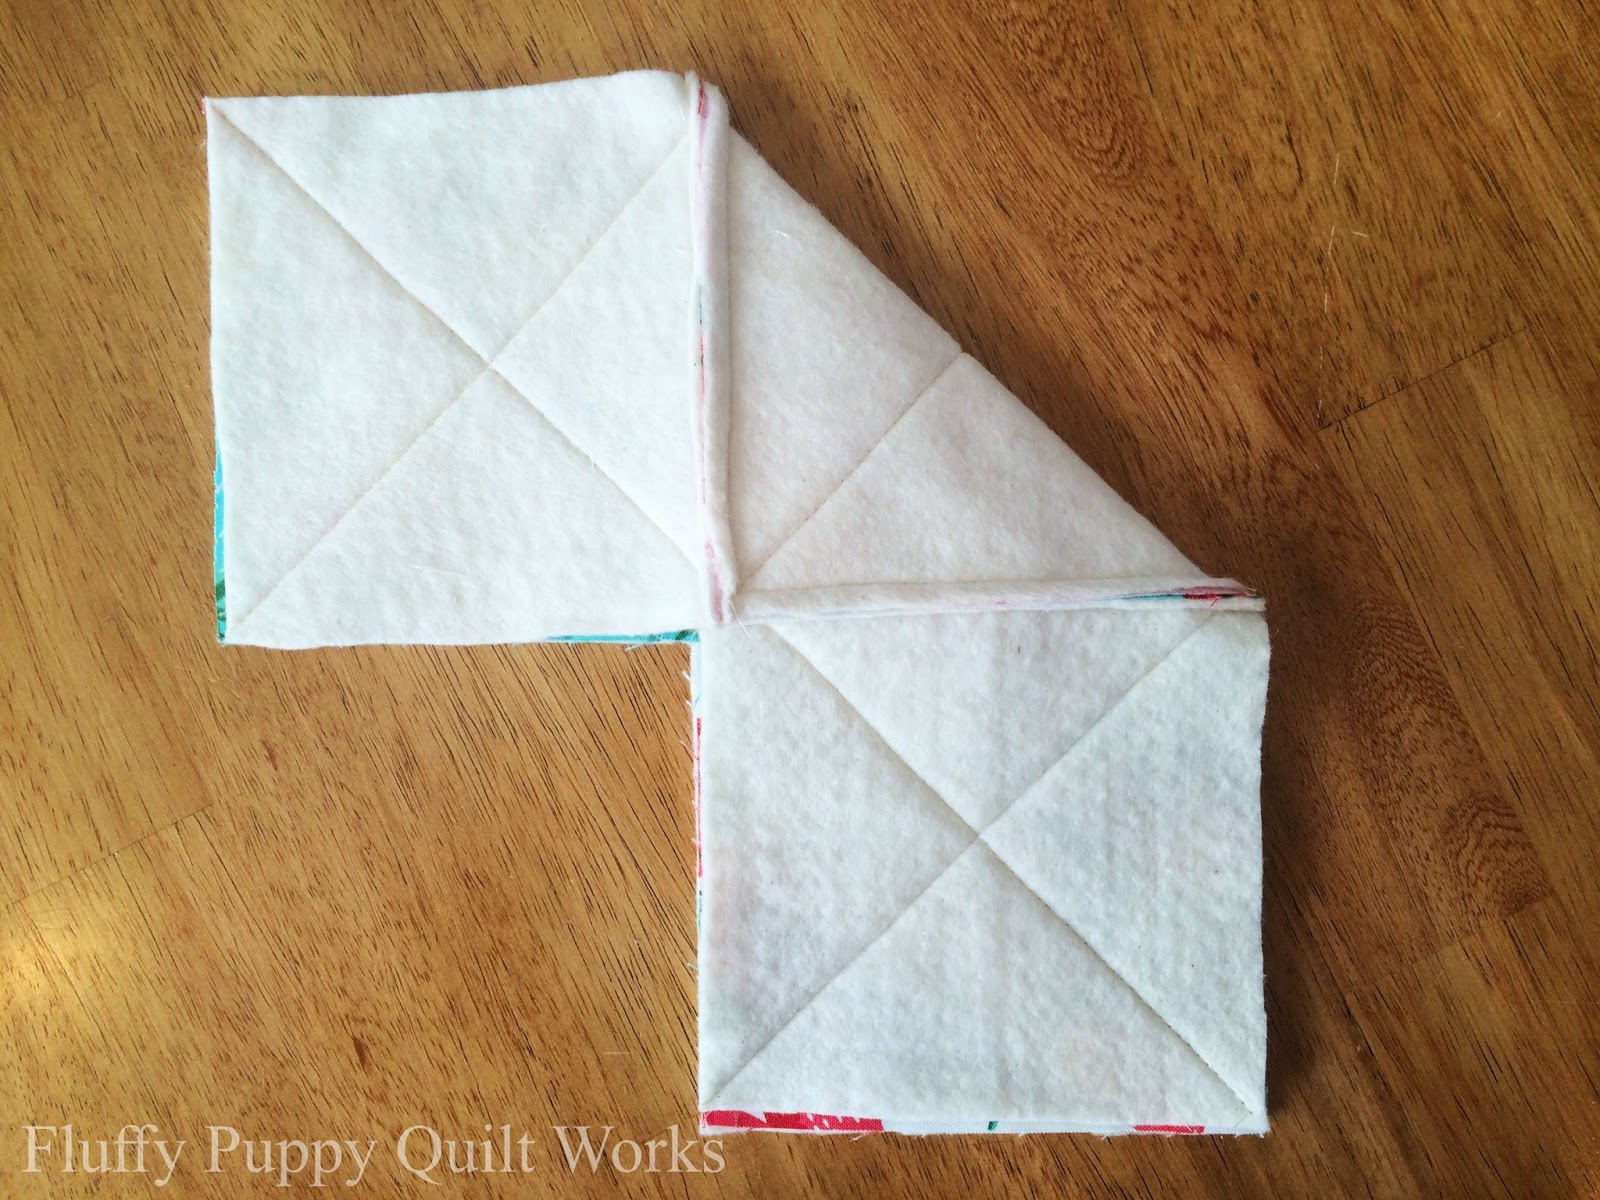
Step 4: Lay a second side square on the top square right sides together. Sew along the side next to the first side square. Begin and end your seam exactly 1/4" (or the length of your seam allowance) away from the edge. Remember to back stitch well to lock your seams.

The photo below shows how the seam of the second side square begins exactly where the first side square seam is.

The next photo below shows how your squares should look when you lay them open.

Below is how the corner where the seams meet should look.

Step 5: Lay a 3rd side square on the top square. Sew together, beginning and ending 1/4" (or the length of your seam allowance) away from the edges just as the last two side squares were sewn on.


Step 6: Lay the last side square on the top square. Sew onto the bottom square, beginning and ending 1/4" (or the length of your seam allowance) away from the edges. Even though you have a side square on each side of the last square instead of just one side, the sewing method is exactly the same.


The backs of your 5 squares should resemble the photo below.

Step 7: Fold your squares in half diagonally right sides together. Sew down squares as shown in the next photos. Start a 1/4" away from the edge of the squares, but as you reach the top square you can continue sewing off the edge. Back stitch well at the beginning and ends.


Notice how in the photo above, the seam starts 1/4" down from the edge, then continues through the side square/top square seam.
After sewing two of the side squares together, your cube should resemble the photo below.

Step 8: Continue folding the cube to put the open square sides together, sewing one side closed at a time. Remember to start a 1/4" (or the length of your seam allowance) down from the edges of the squares, but you can sew all the way down as you reach the cube top square.


Step 9: Sew on the bottom square. Align the square with the edge of one of the side squares right sides together. Sew using a 1/4" seam allowance. Just as before, begin and end your seam 1/4" (or the length of your seam allowance) away from the edge.


Your cube should resemble the photo below.

Step 10: Turn the cube and sew the bottom square to the next side square. On the side where the bottom square is already sewn down, you can run your seam off the edge of the fabric. On the other edge, stop the seam the length of your seam allowance away from the edge, just like when the side squares where sewn together after being sewn to the top square.


Step 11: Sew a 1" seam at each side of the final opening. Back stitch very well on each of these seams. You can sew off the ends of the squares here.

Step 12: Turn your pincushion right sides out.

Step 13: Now for the really fun part! Stuff your pincushion. Use the eraser end of a pencil (or something similar) to shove the stuffing into the corners.

Step 14: Hand or machine sew the opening closed using your preferred method. This part is completely up to you, it just depends on what you think your cube needs, and what sewing method your are comfortable with.
Enjoy your new pincushion! Thank you for reading!
*Note: Why begin sewing the sides to the top first? This way the final seam after turning the cube right sides out will be at the bottom, much less noticeable than at the top.

Step 3: Using a 1/4" seam allowance*, sew across one side of the squares, beginning and ending 1/4" away from the ends.
**Note: You may use whatever seam allowance you like, though 1/4" is recommended for a small pincushion. For a larger pillow, you may want to use a 1/2" seam allowance to make it more durable. Make sure that when you begin and end your seam, the distance away from the squares ends should equal your seam allowance. Example for 1/2" seam allowance: Using a 1/2" seam allowance, sew across one side of the squares, beginning and ending 1/4" away from the ends.


Your seam should resemble the photo above. The photo below is what your squares should look like when you open them.

Step 4: Lay a second side square on the top square right sides together. Sew along the side next to the first side square. Begin and end your seam exactly 1/4" (or the length of your seam allowance) away from the edge. Remember to back stitch well to lock your seams.

The photo below shows how the seam of the second side square begins exactly where the first side square seam is.

The next photo below shows how your squares should look when you lay them open.

Below is how the corner where the seams meet should look.

Step 5: Lay a 3rd side square on the top square. Sew together, beginning and ending 1/4" (or the length of your seam allowance) away from the edges just as the last two side squares were sewn on.


Step 6: Lay the last side square on the top square. Sew onto the bottom square, beginning and ending 1/4" (or the length of your seam allowance) away from the edges. Even though you have a side square on each side of the last square instead of just one side, the sewing method is exactly the same.


The backs of your 5 squares should resemble the photo below.

Step 7: Fold your squares in half diagonally right sides together. Sew down squares as shown in the next photos. Start a 1/4" away from the edge of the squares, but as you reach the top square you can continue sewing off the edge. Back stitch well at the beginning and ends.


Notice how in the photo above, the seam starts 1/4" down from the edge, then continues through the side square/top square seam.
After sewing two of the side squares together, your cube should resemble the photo below.

Step 8: Continue folding the cube to put the open square sides together, sewing one side closed at a time. Remember to start a 1/4" (or the length of your seam allowance) down from the edges of the squares, but you can sew all the way down as you reach the cube top square.


Step 9: Sew on the bottom square. Align the square with the edge of one of the side squares right sides together. Sew using a 1/4" seam allowance. Just as before, begin and end your seam 1/4" (or the length of your seam allowance) away from the edge.


Your cube should resemble the photo below.

Step 10: Turn the cube and sew the bottom square to the next side square. On the side where the bottom square is already sewn down, you can run your seam off the edge of the fabric. On the other edge, stop the seam the length of your seam allowance away from the edge, just like when the side squares where sewn together after being sewn to the top square.


Step 11: Sew a 1" seam at each side of the final opening. Back stitch very well on each of these seams. You can sew off the ends of the squares here.

Step 12: Turn your pincushion right sides out.

Step 13: Now for the really fun part! Stuff your pincushion. Use the eraser end of a pencil (or something similar) to shove the stuffing into the corners.

Step 14: Hand or machine sew the opening closed using your preferred method. This part is completely up to you, it just depends on what you think your cube needs, and what sewing method your are comfortable with.
Enjoy your new pincushion! Thank you for reading!
Excellent tutorial.
ReplyDeleteThanks for a well explained and photo tutorial. I was thinking this tut could be used to make a child's play ball :)
ReplyDelete